
ماژول ESP-01 یک نسخه کوچک از ماژول های ESP8266 میباشد . این ماژول در جهت افزودن قابلیت WiFi به MCU ها طراحی شده است لذا تنها چند پین ESP8266EX در دسترس است . ESP-01 کاربرد های خاص خود را دارد لذا در بسیاری از موارد جایگزین کردن آن با مدل های ESP MOD و… مقرون به صرفه نمی باشد . در این پروژه قصد داریم LED های WS2812 را با استفاد از این ماژول راه اندازی کنیم . از آنجایی که WS2812 تنها به یک پین از MCU برای راه اندزای نیاز دارند لذا استفاده از ESP-01 ایده خوبی به نظر می رسد . ماژول ESP-01 بر خلاف دیگر برد های توسعه ESP8266 فاقد کلید های ریست و فلش است لذا باید به صورت دستی این برد را به حالت پروگرام ببرید .
ابتدا برد خود را همانند تصویر زیر به یک مبدل USB-TTL متصل کنید :
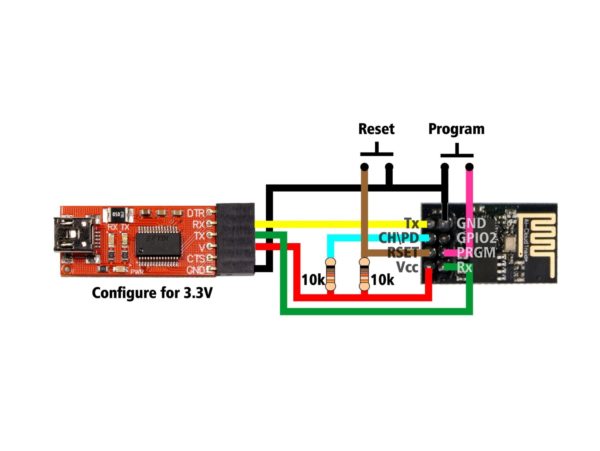
در مدار فوق با فشردن کلید ریست ماژول ریست می شود . همچنین اگر کلید Program رو نگه دارید و همزمان دکمه ریست را بزنید ماژول وارد مد پروگرام خواهد شد که می توانید کد های خود را بر روی برد آپلود کنید .
پس از بستن مدار فوق و انتخاب مد پروگرام ، در آردوینو IDE از منو Board گزینه ESP8266 را انتخاب کنید ( باید از قبل SDK های ESP8266 را در آردوینو IDE نصب کرده باشید . در آموزش های قبلی چگونگی این کار شرح داده شد ) .
کد های زیر را در آردوینو IDE کبی کنید و آن را در یک فولدر ذخیره نمایید :
#include <ESP8266WiFi.h>
#include <ESP8266mDNS.h>
#include <WiFiUdp.h>
#include <ArduinoOTA.h>
#include <FastLED.h>
#include <ESP8266WiFiMulti.h>
#include <WebSocketsServer.h>
#include <Hash.h>
#include <EEPROM.h>

// Wifi credentials
const char* ssid = "نام وایفای خود را وارد کنید";
const char* password = "رمز وایفای خود را وارد کنید";
const char* espname = "your ESP name";  //Shows in router and in OTA-menu


// Defining LED strip
#define NUM_LEDS 30                 //Number of LEDs in your strip
#define DATA_PIN 2                 //Using WS2812B -- if you use APA102 or other 4-wire LEDs you need to also add a clock pin
CRGB leds[NUM_LEDS];
CRGBSet ledSet(leds, NUM_LEDS);    //Trying LEDSet from FastLED

//Some Variables
byte myEffect = 1;                  //what animation/effect should be displayed

byte myHue = 33;                    //I am using HSV, the initial settings display something like "warm white" color at the first start
byte mySaturation = 168;
byte myValue = 255;

byte rainbowHue = myHue;            //Using this so the rainbow effect doesn't overwrite the hue set on the website

int flickerTime = random(200, 400);
int flickerLed;
int flickerValue = 110 + random(-3, +3); //70 works nice, too
int flickerHue = 33;

bool eepromCommitted = true;

unsigned long currentTime = 0;
unsigned long previousTime = 0;
unsigned long lastChangeTime = 0;
unsigned long currentChangeTime = 0;

#include "LEDanimations.h"
#include "LEDWebsockets.h"

void setup() {
  EEPROM.begin(4);                                    // Using simulated EEPROM on the ESP8266 flash to remember settings after restarting the ESP
  LEDS.addLeds<WS2812B,DATA_PIN,GRB>(leds,NUM_LEDS);  // Initialize the LEDs

  // Reading EEPROM
  myEffect = EEPROM.read(0);                          // Only read EEPROM for the myEffect variable after you're sure the animation you are testing won't break OTA updates, make your ESP restart etc. or you'll need to use the USB interface to update the module.
  myHue = EEPROM.read(1);
  mySaturation = EEPROM.read(2);
  myValue = EEPROM.read(3);

  delay(100);                                         //Delay needed, otherwise showcolor doesn't light up all leds or they produce errors after turning on the power supply - you will need to experiment
  LEDS.showColor(CHSV(myHue, mySaturation, myValue));

// Starting Wifi
  WiFi.hostname(espname);
  WiFi.mode(WIFI_STA);
  while (WiFi.waitForConnectResult() != WL_CONNECTED) {
    WiFi.begin(ssid, password);
    delay(500);
  }

// All this below is for OTA-updates
  // Port defaults to 8266
  // ArduinoOTA.setPort(8266);

  // Hostname defaults to esp8266-[ChipID]
  ArduinoOTA.setHostname(espname);

  // No authentication by default
  // ArduinoOTA.setPassword((const char *)"123");

  ArduinoOTA.begin();

  //Websocket server
  webSocket.begin();
  webSocket.onEvent(webSocketEvent);
}


void loop() {
  ArduinoOTA.handle();                        // handles OTA-updates
  // yield();                                 // uncomment if you run into watchdog resets
  webSocket.loop();                           // handles websockets
  // yield();                                 // uncomment if you run into watchdog resets

switch (myEffect) {                           // switches between animations
    case 1: // Solid Color
      EVERY_N_MILLISECONDS( 20 ) {
        ledSet = CHSV(myHue, mySaturation, myValue);
        LEDS.show();
      }
      break;
    case 2: // Ripple effect
      ripple();
      break;
    case 3: // Cylon effect
      cylon();
      break;
    case 4: // Fire effect
      Fire2012();
      break;
    case 5: // Turn off all LEDs
      EVERY_N_MILLISECONDS( 20 ) {
      ledSet.fadeToBlackBy(2);
      LEDS.show();
      }
      break;
    case 6: // loop through hues with all leds the same color. Can easily be changed to display a classic rainbow loop
      EVERY_N_MILLISECONDS( 250 ) {
      rainbowHue = rainbowHue + 1;
      LEDS.showColor(CHSV(rainbowHue, mySaturation, myValue));
     }
      break;
    case 7: // make a single, random LED act as a candle
      currentTime = millis();
      ledSet.fadeToBlackBy(1);
      leds[flickerLed] = CHSV(flickerHue, 255, flickerValue);
      flickerTime = random(150, 500);
      if (currentTime - previousTime > flickerTime) {
        flickerValue = 110 + random(-10, +10); //70 works best
        flickerHue = 33; //random(33, 34);
        previousTime = currentTime;
        LEDS.show();
      }
      break;
    default:
      LEDS.showColor(CRGB(0, 255, 0)); // Bright green in case of an error
    break;
  }

  // EEPROM-commit and websocket broadcast -- they get called once if there has been a change 1 second ago and no further change since. This happens for performance reasons.
  currentChangeTime = millis();
  if (currentChangeTime - lastChangeTime > 1000 && eepromCommitted == false) {
    EEPROM.commit();
    eepromCommitted = true;
    String websocketStatusMessage = "H" + String(myHue) + ",S" + String(mySaturation) + ",V" + String(myValue);
    webSocket.broadcastTXT(websocketStatusMessage); // Tell all connected clients which HSV values are running
    //LEDS.showColor(CRGB(0, 255, 0));  //for debugging to see when if-clause fires
    //delay(50);                        //for debugging to see when if-clause fires
  }
}
قبل از کامپایل کد های فوق ، در پوشه مربوط به برنامه دو فایل txt ایجاد کرده و کد های زیر را در آن ها کپی کنید :
اسم فایل txt را به LEDanimations.h تغییر دهید ( اگر پیغامی مشاهده کردین ok بزنید )
int color;
int center = 0;
int step = -1;
int maxSteps = 16;
float fadeRate = 0.8;
int diff;

//background color
uint32_t currentBg = random(256);
uint32_t nextBg = currentBg;


int wrap(int step) {
  if(step < 0) return NUM_LEDS + step;
  if(step > NUM_LEDS - 1) return step - NUM_LEDS;
  return step;
}


void one_color_allHSV(int ahue, int abright) {                // SET ALL LEDS TO ONE COLOR (HSV)
  for (int i = 0 ; i < NUM_LEDS; i++ ) {
    leds[i] = CHSV(ahue, 255, abright);
  }
}

void ripple() {

    if (currentBg == nextBg) {
      nextBg = random(256);
    }
    else if (nextBg > currentBg) {
      currentBg++;
    } else {
      currentBg--;
    }
    for(uint16_t l = 0; l < NUM_LEDS; l++) {
      leds[l] = CHSV(currentBg, 255, 50);         // strip.setPixelColor(l, Wheel(currentBg, 0.1));
    }

  if (step == -1) {
    center = random(NUM_LEDS);
    color = random(256);
    step = 0;
  }

  if (step == 0) {
    leds[center] = CHSV(color, 255, 255);         // strip.setPixelColor(center, Wheel(color, 1));
    step ++;
  }
  else {
    if (step < maxSteps) {
      //Serial.println(pow(fadeRate,step));

      leds[wrap(center + step)] = CHSV(color, 255, pow(fadeRate, step)*255);       //   strip.setPixelColor(wrap(center + step), Wheel(color, pow(fadeRate, step)));
      leds[wrap(center - step)] = CHSV(color, 255, pow(fadeRate, step)*255);       //   strip.setPixelColor(wrap(center - step), Wheel(color, pow(fadeRate, step)));
      if (step > 3) {
        leds[wrap(center + step - 3)] = CHSV(color, 255, pow(fadeRate, step - 2)*255);     //   strip.setPixelColor(wrap(center + step - 3), Wheel(color, pow(fadeRate, step - 2)));
        leds[wrap(center - step + 3)] = CHSV(color, 255, pow(fadeRate, step - 2)*255);     //   strip.setPixelColor(wrap(center - step + 3), Wheel(color, pow(fadeRate, step - 2)));
      }
      step ++;
    }
    else {
      step = -1;
    }
  }

  LEDS.show();
  delay(50);
}
// RIPPLE END

// Fire2012 Start
#define FRAMES_PER_SECOND 25

bool gReverseDirection = false;

#define COOLING  100

// SPARKING: What chance (out of 255) is there that a new spark will be lit?
// Higher chance = more roaring fire.  Lower chance = more flickery fire.
// Default 120, suggested range 50-200.
#define SPARKING 70


void Fire2012()
{
// Array of temperature readings at each simulation cell
  static byte heat[NUM_LEDS];

  // Step 1.  Cool down every cell a little
    for( int i = 0; i < NUM_LEDS; i++) {
      heat[i] = qsub8( heat[i],  random8(0, ((COOLING * 10) / NUM_LEDS) + 2));
    }

    // Step 2.  Heat from each cell drifts 'up' and diffuses a little
    for( int k= NUM_LEDS - 1; k >= 2; k--) {
      heat[k] = (heat[k - 1] + heat[k - 2] + heat[k - 2] ) / 3;
    }

    // Step 3.  Randomly ignite new 'sparks' of heat near the bottom
    if( random8() < SPARKING ) {
      int y = random8(7);
      heat[y] = qadd8( heat[y], random8(160,255) );
    }

    // Step 4.  Map from heat cells to LED colors
    for( int j = 0; j < NUM_LEDS; j++) {
      CRGB color = HeatColor( heat[j]);
      int pixelnumber;
      if( gReverseDirection ) {
        pixelnumber = (NUM_LEDS-1) - j;
      } else {
        pixelnumber = j;
      }
      leds[pixelnumber] = color;
    }
  FastLED.show(); // display this frame
  FastLED.delay(1000 / FRAMES_PER_SECOND);
}
//Fire2012 End
//CYLON START


void fadeall() { for(int i = 0; i < NUM_LEDS; i++) { leds[i].nscale8(200); } }

void cylon(){
  static uint8_t hue = 0;
  //Serial.print("x");
  // First slide the led in one direction
  for(int i = 0; i < NUM_LEDS; i++) {
    // Set the i'th led to red
    leds[i] = CHSV(hue++, 255, 255);
    // Show the leds
    FastLED.show();
    // now that we've shown the leds, reset the i'th led to black
    // leds[i] = CRGB::Black;
    fadeall();
    // Wait a little bit before we loop around and do it again
    delay(25);
  }
  //Serial.print("x");

  // Now go in the other direction.
  for(int i = (NUM_LEDS)-1; i >= 0; i--) {
    // Set the i'th led to red
    leds[i] = CHSV(hue++, 255, 255);
    // Show the leds
    FastLED.show();
    // now that we've shown the leds, reset the i'th led to black
    // leds[i] = CRGB::Black;
    fadeall();
    // Wait a little bit before we loop around and do it again
    delay(25);
  }
  }
کد های زیر را نیز در فایل txt دیگری کپی کرده و در آخر اسم فایل را به LEDWebsockets.h تغییر دهید .
WebSocketsServer webSocket = WebSocketsServer(81);

void webSocketEvent(uint8_t num, WStype_t type, uint8_t * payload, size_t lenght) {

    switch(type) {
        case WStype_DISCONNECTED:
            //USE_SERIAL.printf("[%u] Disconnected!\n", num);
            break;
        case WStype_CONNECTED:
            {
                IPAddress ip = webSocket.remoteIP(num);
                //USE_SERIAL.printf("[%u] Connected from %d.%d.%d.%d url: %s\n", num, ip[0], ip[1], ip[2], ip[3], payload);

        // send message to client
        String websocketStatusMessage = "H" + String(myHue) + ",S" + String(mySaturation) + ",V" + String(myValue); //Sends a string with the HSV values to the client website when the conection gets established
        webSocket.sendTXT(num, websocketStatusMessage);

        String info = ESP.getResetInfo();
        webSocket.sendTXT(num, info); //Handy for debugging
            }
            break;
        case WStype_TEXT:
            {
              //USE_SERIAL.printf("[%u] get Text: %s\n", num, payload);


            // send message to client
            // webSocket.sendTXT(num, "message here");

            // send data to all connected clients
            // webSocket.broadcastTXT("message here");

            String text = String((char *) &payload[0]);

             if (text.startsWith("a")) {
               String xVal = (text.substring(text.indexOf("a") + 1, text.length()));
                flickerLed = random(0,NUM_LEDS-1);
                if (myEffect != xVal.toInt()) {  // only do stuff when there was a change
                myEffect = xVal.toInt();
                rainbowHue = myHue;
                EEPROM.write(0, myEffect);       //stores the variable but needs to be committed to EEPROM before being saved - this happens in the loop
                lastChangeTime = millis();
                eepromCommitted = false;
                }
             }
             if (text.startsWith("b")) {
               String xVal = (text.substring(text.indexOf("b") + 1, text.length()));
                if (myHue != xVal.toInt()) {
                myHue = xVal.toInt();
                rainbowHue = myHue;
                EEPROM.write(1, myHue);
                lastChangeTime = millis();
                eepromCommitted = false;
                }
             }
              if (text.startsWith("c")) {
               String xVal = (text.substring(text.indexOf("c") + 1, text.length()));
                if (mySaturation != xVal.toInt()) {
                mySaturation = xVal.toInt();
                EEPROM.write(2, mySaturation);
                lastChangeTime = millis();
                eepromCommitted = false;
                }
             }
              if (text.startsWith("d")) {
               String xVal = (text.substring(text.indexOf("d") + 1, text.length()));
                if (myValue != xVal.toInt()) {
                myValue = xVal.toInt();
                EEPROM.write(3, myValue);
                lastChangeTime = millis();
                eepromCommitted = false;
                }
             }
             /*currentTime = millis();
              if (currentTime - previousTime > 1000) {
                String websocketStatusMessage = "H" + String(myHue) + ",S" + String(mySaturation) + ",V" + String(myValue);
                webSocket.broadcastTXT(websocketStatusMessage);
                previousTime = currentTime;
               }*/
            break;
            }
        case WStype_BIN:
            //USE_SERIAL.printf("[%u] get binary lenght: %u\n", num, lenght);
            hexdump(payload, lenght);

            // send message to client
            // webSocket.sendBIN(num, payload, lenght);
            break;
    }

}
سپس کد های اصلی را کامپایل و آن را در فولدری که قبلا برای پروژه ساخته بودید ذخیره کنید . این فایل حتما باید در کنار دو فایل LEDWebsockets.h و LEDanimations.h ذخیره شود .
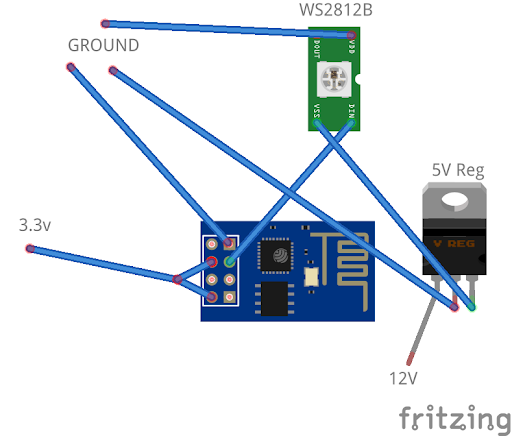
پس از کامپایل کردن برنامه کد ها را بر روی برد ESP-01 خود آپلود کنید . پس از آپلود کد ها وارد محیط Serial monitor آردوینو IDE شوید و یک بار ماژول را ریست کنید . IP را که نشان داده می شود به خاطر بسپارید . از این IP برای ارتباط با ماژول استفاده خواهد شد ( این IP را در تنظیمات مودم خود نیز می توانید پیدا کنید ) . سپس WS2812 را همانند تصویر زیر به ماژول متصل کنید :
پس از اتصال تغذیه و روشن شدن مدار ، IP ماژول را در مرورگر خود وارد کنید تا پنل کنترل LED باز شود .