
باتری های لیتیومی کاربرد فراوانی در دستگاه های پرتابل دارند . محاسبه مصرف انرژی مدار و همچنین اطلاع از ظرفیت باتری ها می تواند تقریبی از میزان روشن ماندن دستگاه به شما بدهد . در این پروژه با استفاده از یک برد آردوینو و چند قطعه دیگر یک تستر باتری لیتیومی خواهیم ساخت . این تستر برای یک سل می باشد در واقع نباید ولتاژ های بیشتر از 5 را به آن متصل کنید . عملکرد این مدار بسیار ساده است ، با فشردن یک دکمه آردوینو با استفاده از یک رله دو سر باتری را با یک مقاومت موازی می کند و در بازه های زمانی مختلف اقدام به اندازه گیری ولتاژ می کند که از این طریق ظرفیت باتری را به دست می آورد .
قطعاتی که برا ساخت این پروژه به آن نیاز دارید :
1- برد آردوینو (UNO یا NANO )
2- ماژول رله تک کاناله
3- LCD کاراکتری 2 در 16
4- مقاومتر 10 مگا اهمی
5- کلید تکی
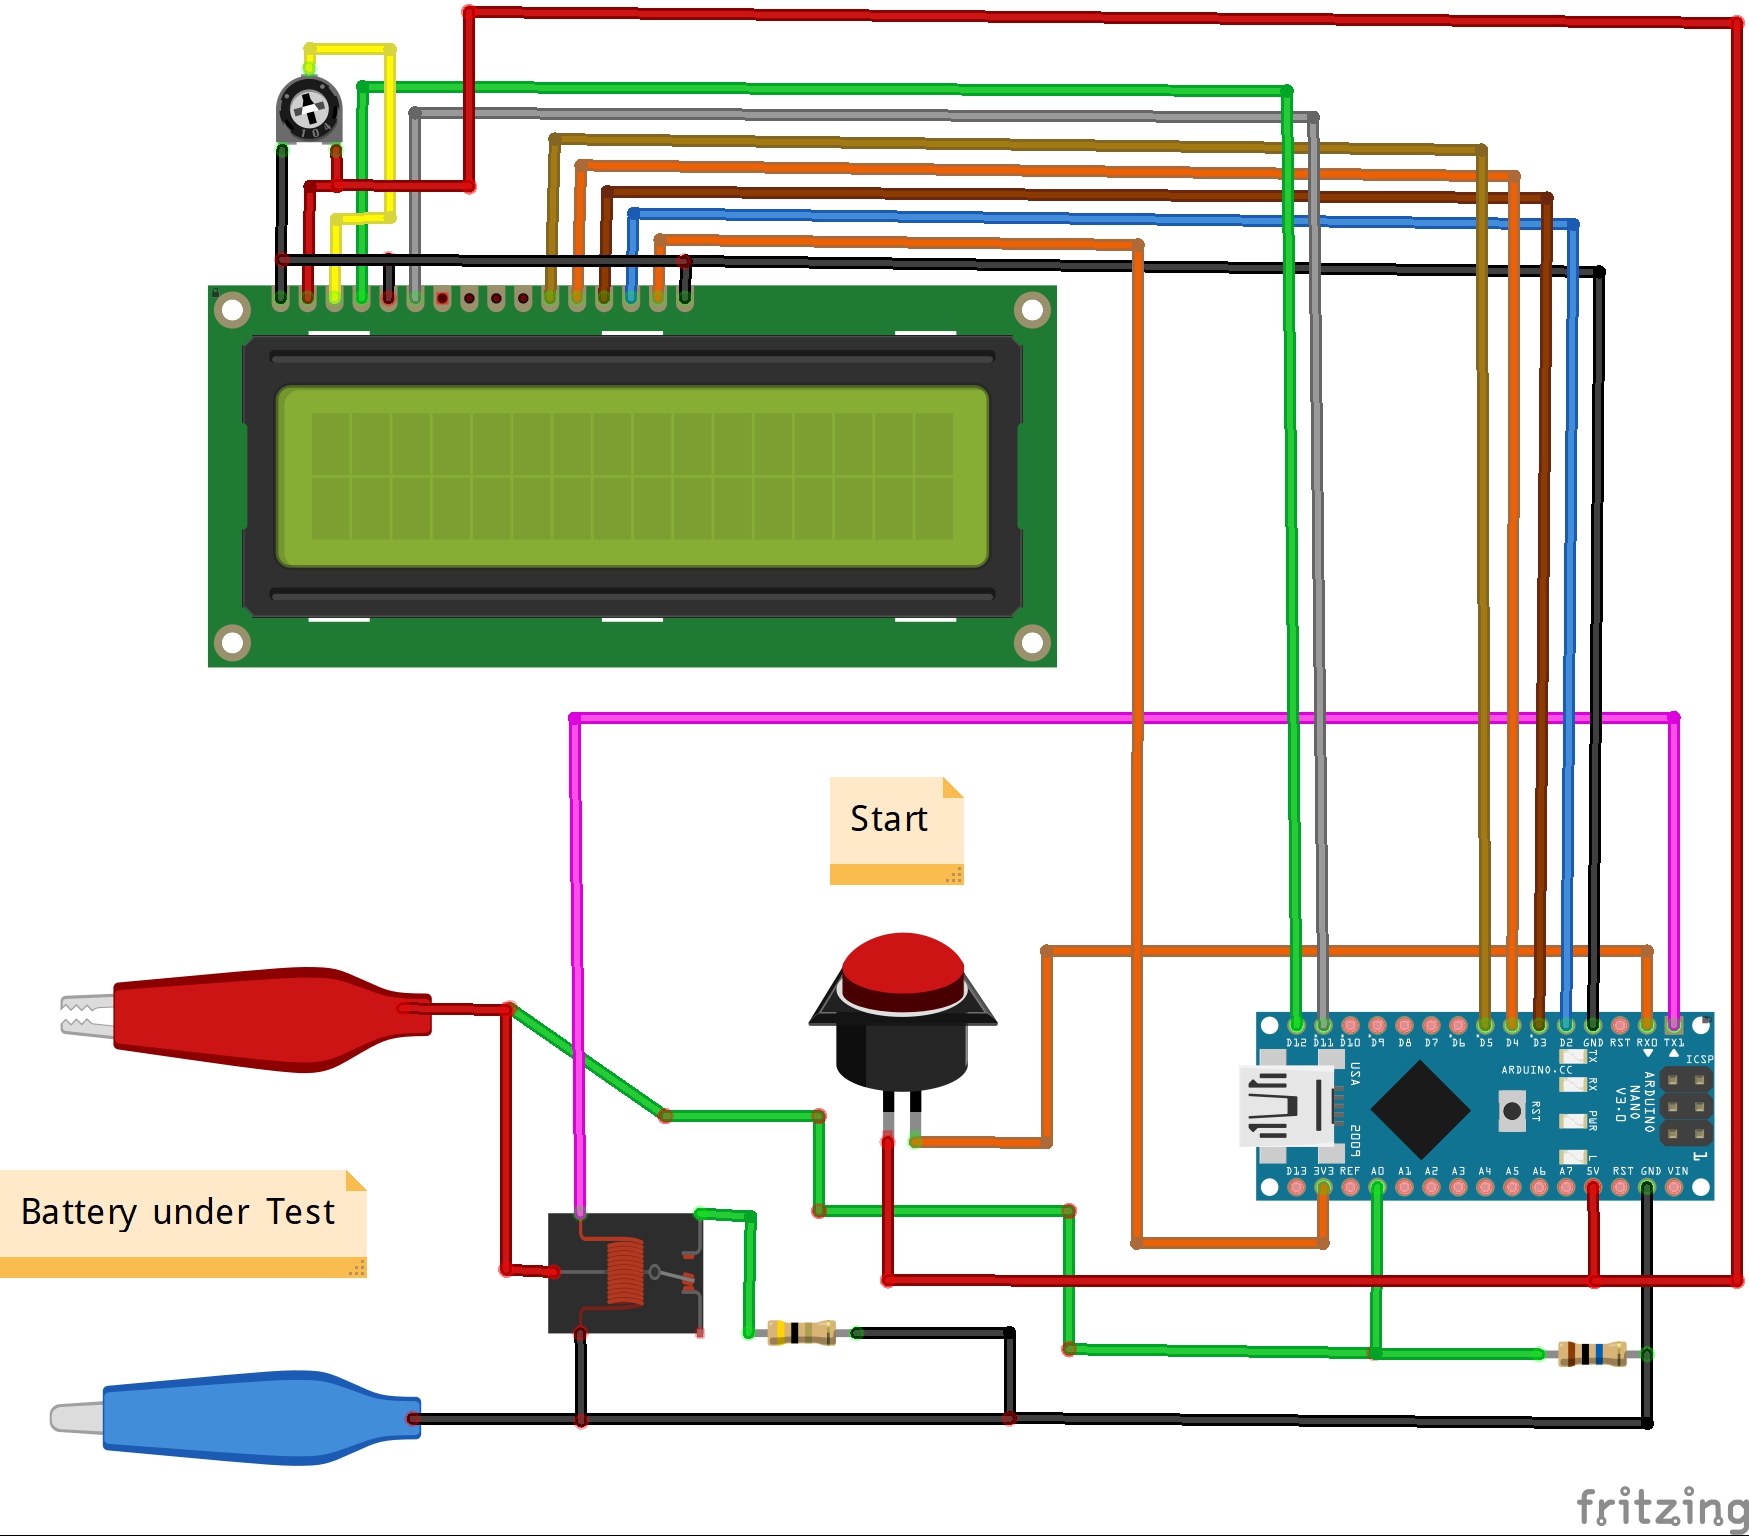
قطعات فوق را مانند تصویر زیر به همدیگر متصل کنید :
کد های آردوینو :
/*
A battery life cycle tester using an Lcd as output
*/

// include the library code:
#include <LiquidCrystal.h>

// initialize the library with the numbers of the interface pins
LiquidCrystal lcd(12, 11, 5, 4, 3, 2);
const int buttonPin = 9;
int sensorPin = A0;    // select the input pin for the Battery
int sensorValue = 0;  // variable to store the value coming from the sensor
const int relay= 10;
int buttonState = 0;
float mah = 0.0;
long timestart  ;

void setup() {
  // set up the LCD's number of columns and rows:
  lcd.begin(16, 2);
  // Print a message to the LCD.
  lcd.print("Batt life tester");
  pinMode(relay, OUTPUT);
pinMode(buttonPin, INPUT);
}

void loop() {
  // set the cursor to column 0, line 1
  // (note: line 1 is the second row, since counting begins with 0):
  digitalWrite(relay, 0 ); //set the LED-relay off

  while (buttonState == LOW ) {
  sensorValue = analogRead(sensorPin); // read the battery

  buttonState = digitalRead(buttonPin);

  lcd.setCursor(0, 1);
  lcd.print((sensorValue*4.98)/1023);
  lcd.print(" Volts");
  delay(500);
  } //end get ready loop
  digitalWrite(relay, 1 ); //set the LED-relay on
  lcd.setCursor(0, 0);
  lcd.print("Testing              ");
  lcd.setCursor(0, 1);
  lcd.print("                         ");
  mah = 0.0;
  timestart = millis( );
  while ( ((sensorValue*4.98)/1023) > 3.00 ) {
     lcd.setCursor(0, 1);
     lcd.print((sensorValue*4.98)/1023);
     lcd.print(" V ");
     sensorValue = analogRead(sensorPin); // read the battery
     mah = mah + (((sensorValue*4.98)/1023)/4 )/7.2;
     lcd.print(mah);
     lcd.print(" mAh ");
     delay ( 500 ) ;
     lcd.setCursor(8,0);
     lcd.print((millis( )- timestart)/1000); // time since test staarted
  } // end battery drain
    digitalWrite(relay, 0 ); //set the LED-relay off

  // final results

   lcd.setCursor(0, 0);
   lcd.print(mah);
   lcd.print(" mAH ");
   lcd.print((millis( )- timestart)/1000);
   lcd.print(" S ");
   buttonState = digitalRead(buttonPin);

}
پس از بستن مدار و پروگرام کردن آردوینو می توانید باتری لیتیومی خود را به مدار متصل کنید تا ظرفیت آن نشان داده شود . این کار بسته به ظرفیت باتری شما ممکن است کمی طول بکشد .
تنها یک سل را می توانید به این مدار متصل کنید و اگر ولتاژ باتری بیشتر از 5 ولت باشد به مدار آسیب وارد می کند .
همچنین در شماتیک بالا رله به طور مصتقیم به آردوینو متصل شده است اما در عمل حتما باید از ماژول رله استفاده کنید ( به دلیل وجود بافر ) .
منبع :https://create.arduino.cc/projecthub/mircemk/lithium-battery-capacity-tester-b65d7c?ref=search&ref_id=battery&offset=7
سلام دوست عزیز لطفا اگر مقدوره جواب پرسش من رو بده چون خیلی فوریه
مقدار مقاومت دوم ( اجری ) چقدر هست چون توی توضیحات ذکر نشده
سلام مجدد و متشکرم که پاسخ میدید
اگر بخوام جای مقاومت شنت مقاومت ۱ اهم قرار بدم چه تغییری باید در کد ایجاد کنم؟