
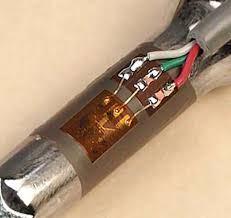
لودسل ها سنسور های اندازه گیری نیرو می باشند که جهت اندازه گیری تنش های مختلف و وزن اجسام ساخته می شوند . در واقع یک لودسل امکان اندازه گیری تنش وارد بر اجسام را می دهد . بر اساس نوع تنشی که یک لودسل اندازه گیری می کند شکل آن متفاوت است . به طور مثال یک لودسل برای اندازه گیری تنش های پیچشی به صورت دایره ای شکل می باشد . یا لودسل های اندازه گیری وزن و تنش فشاری معمولا به شکل مکعب های باریکی می باشند که بار در سر آن ها قرار می گیرد . لودسل ها بر اساس تکنولوژی های مختلفی ساخته می شود . به طور مثال در مدل های پیزو ، از مواد دارای خاصیت پیزو الکتریک استفاده می شود به طوریکی با اعمال فشار به سنسور ، سیگنال الکتریکی ضعیفی ایجاد خواهد شد . همچنین برخی لودسل ها به صورت پنوماتیکی یا هیدرولیکی می باشند . یکی از معمول ترین انواع لودسل ها ، لودسل های استرین گیجی می باشند . در این لودسل ها یک یا چند استرین گیج بر روی بردنه لودسل نصب شده است که با اعمال فشار به لودسل و در نتیجه آن تغیییر شکل لودسل ، مقاومت استرین گیج ها تغییر کرده و از این طریق می توان مقدار نیرو را اندازه گیری کرد . به دلیل راه اندازی راحت و همچنین ملزومات پایین در راه اندازی ، لودسل های استرین گیج دار کاربرد فراوانی در صنایع دارند . همچنین امکان اندازه گیری کرنش را نیز دارند . در آزمایشگاه ها و همچنین در صناایع از استرین گیج ها جهت اندازه گیری کرنش مواد استفاده می شود . کرنش سنج ها علاوه بر قیمت بالایی که دارند معمولا یک بار مصرف می باشند . در واقع یک بار با استفاده از چسب مخصوص آن ها را بر روی سطح چسبانده و دیگر نمی توان آن را جدا کرد . اما لودسل های استرین گیچی را به راحلی با استفاده از پیچ و مهره می توان به سطوح متصل کرد . البته اندازه گیری کرنش با استفاده از لود سل ها پیش نهاد نمی شود چراکه علاوه بر ضریب تغییرات کرنش متفاوت لودسل با سطح مد نظر ، به دلیل ضخامت لودسل مقدار کرنش اندازه گیری شده دارای خطای زیادی خواهد بود و حتما برای اندازه گیری کرنش باید استرین گیج را بر روی سطح چسباند . در تصویر زیر یک استرین گیج نشان داده شده است :
در لودسل های دارای استرین گیج ، به دلیل تغیرات مقاوت پایین از پل وتستون در خروجی استفاده می شود (اغلی آرایش استرین گیج های متصل به لودسل به صورت پل وتستون می باشد ) . برای راه اندازی لودسل ها می توانید از واحد ADC میکروکنترلر استفاده کنید اما به دلیل دقت پایین این کار پیشنهادنمی گردد . می توانید از ماژول HX711 برای اتصال لودسل به میکروکنترلر ها استفاده کنید . ماژول AD711 یک ADC با دقت بالا می باشد که جهت اتصال لود سل به MCU طراحی شده است .
در تصویر زیر می توانید پین های این مازول را مشاهده کنید :

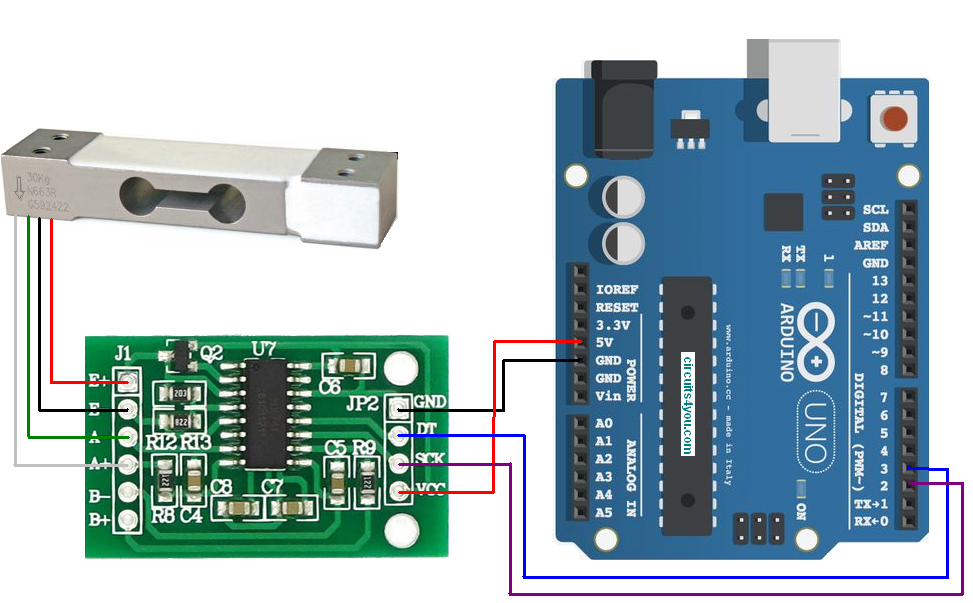
راه اندازی لودسل با استفاده از آردوینو :
در مثال زیر از ماژول HX711 جهت اتصال لود سل به آردوینو استفاده شده است .
کد های زیر را بر روی برد خود آپلود کنید :
/*
 * https://circuits4you.com
 * 2016 November 25
 * Load Cell HX711 Module Interface with Arduino to measure weight in Kgs
 Arduino
 pin
 2 -> HX711 CLK
 3 -> DOUT
 5V -> VCC
 GND -> GND

 Most any pin on the Arduino Uno will be compatible with DOUT/CLK.
 The HX711 board can be powered from 2.7V to 5V so the Arduino 5V power should be fine.
*/

#include "HX711.h"  //You must have this library in your arduino library folder

#define DOUT  3
#define CLK  2

HX711 scale(DOUT, CLK);

//Change this calibration factor as per your load cell once it is found you many need to vary it in thousands
float calibration_factor = -96650; //-106600 worked for my 40Kg max scale setup

//=============================================================================================
//                         SETUP
//=============================================================================================
void setup() {
  Serial.begin(9600);
  Serial.println("HX711 Calibration");
  Serial.println("Remove all weight from scale");
  Serial.println("After readings begin, place known weight on scale");
  Serial.println("Press a,s,d,f to increase calibration factor by 10,100,1000,10000 respectively");
  Serial.println("Press z,x,c,v to decrease calibration factor by 10,100,1000,10000 respectively");
  Serial.println("Press t for tare");
  scale.set_scale();
  scale.tare(); //Reset the scale to 0

  long zero_factor = scale.read_average(); //Get a baseline reading
  Serial.print("Zero factor: "); //This can be used to remove the need to tare the scale. Useful in permanent scale projects.
  Serial.println(zero_factor);
}

//=============================================================================================
//                         LOOP
//=============================================================================================
void loop() {

  scale.set_scale(calibration_factor); //Adjust to this calibration factor

  Serial.print("Reading: ");
  Serial.print(scale.get_units(), 3);
  Serial.print(" kg"); //Change this to kg and re-adjust the calibration factor if you follow SI units like a sane person
  Serial.print(" calibration_factor: ");
  Serial.print(calibration_factor);
  Serial.println();

  if(Serial.available())
  {
    char temp = Serial.read();
    if(temp == '+' || temp == 'a')
      calibration_factor += 10;
    else if(temp == '-' || temp == 'z')
      calibration_factor -= 10;
    else if(temp == 's')
      calibration_factor += 100;
    else if(temp == 'x')
      calibration_factor -= 100;
    else if(temp == 'd')
      calibration_factor += 1000;
    else if(temp == 'c')
      calibration_factor -= 1000;
    else if(temp == 'f')
      calibration_factor += 10000;
    else if(temp == 'v')
      calibration_factor -= 10000;
    else if(temp == 't')
      scale.tare();  //Reset the scale to zero
  }
}
//=============================================================================================
How to calibrate HX711 Load cell measurement with arduino ?
Once you upload the calibration code, open serial monitor and adjust your scale factor with known weight until you see the correct readings. Press a,s,d,f to increase calibration factor by 10,100,1000,10000 respectively. Press z,x,c,v to decrease calibration factor by 10,100,1000,10000 respectively. Don’t forget to hit enter key to send the data.

Once you see the placed weight is same as shown weight note down calibration factor and use it in Final code for weight measurement.


Note: Before you start running calibration code keep your Load Cell horizontal so that it will not have any weight (Weight of your fixture arrangement). Fixture arrangement causes problem to base line scale. Remove all fixture arrangement and just put known weight directly on load cell.

scale.set_scale();
Once you find the calibration factor update it in below code.

Final Code for Weight Measurement
/*
 * https://circuits4you.com
 * 2016 November 25
 * Load Cell HX711 Module Interface with Arduino to measure weight in Kgs
 Arduino
 pin
 2 -> HX711 CLK
 3 -> DOUT
 5V -> VCC
 GND -> GND

 Most any pin on the Arduino Uno will be compatible with DOUT/CLK.
 The HX711 board can be powered from 2.7V to 5V so the Arduino 5V power should be fine.
*/

#include "HX711.h"  //You must have this library in your arduino library folder

#define DOUT  3
#define CLK  2

HX711 scale(DOUT, CLK);

//Change this calibration factor as per your load cell once it is found you many need to vary it in thousands
float calibration_factor = -96650; //-106600 worked for my 40Kg max scale setup

//=============================================================================================
//                         SETUP
//=============================================================================================
void setup() {
  Serial.begin(9600);
  Serial.println("Press T to tare");
  scale.set_scale(-96650);  //Calibration Factor obtained from first sketch
  scale.tare();             //Reset the scale to 0
}

//=============================================================================================
//                         LOOP
//=============================================================================================
void loop() {
  Serial.print("Weight: ");
  Serial.print(scale.get_units(), 3);  //Up to 3 decimal points
  Serial.println(" kg"); //Change this to kg and re-adjust the calibration factor if you follow lbs

  if(Serial.available())
  {
    char temp = Serial.read();
    if(temp == 't' || temp == 'T')
      scale.tare();  //Reset the scale to zero
  }
}
//=============================================================================================
سلام
ضمن تشكر از شما .بعد از RUN كردن برنامه خطاي no matching for call to ‘HX711::HX711(int,int) رو ميده .