
در پروژه هایی که ماژول ESP32 به عنوان Client به یک مودم یا روتر متصل میشود ، مودم یک Local IP به آن اختصاص می دهد . شما با از طریق این IP می توانید با برد خود ارتباط داشته باشید (به صورت Local ) . با هر بار روشن کردن ESP32 و اتصال آن به مودم ، مودم یک IP جدید را به ماژول اختصاص می دهد . در اغلب پروژه ها ابتدا مقدار IP در Serial monitor نمایش داده می شود که پس از آن می توانید به آن IP متصل شوید . اما اگر بخواهید از یک IP ثابت استفاده کنید به طوریکه هر بار نیازی به چک کردن IP برد نداشته باشید ، می توانید در تنظیمان مودم یک IP ثابت برای مک آدرس برد خود قرار دهید . اما در این آموزش قصد داریم از طریق کد های ESP32 از تغییر IP جلوگیری کنیم و با هر بار روشن شدن برد یک IP ثابت برای اتصال به ESP32 داشته باشیم .
کد های زیر را بر روی ماژول خود آپلود کنید :
/*********
  Rui Santos
  Complete project details at https://randomnerdtutorials.com
*********/

// Load Wi-Fi library
#include <WiFi.h>

// Replace with your network credentials
const char* ssid     = "REPLACE_WITH_YOUR_SSID";
const char* password = "REPLACE_WITH_YOUR_PASSWORD";

// Set web server port number to 80
WiFiServer server(80);

// Variable to store the HTTP request
String header;

// Auxiliar variables to store the current output state
String output26State = "off";
String output27State = "off";

// Assign output variables to GPIO pins
const int output26 = 26;
const int output27 = 27;

// Set your Static IP address
IPAddress local_IP(192, 168, 1, 184);
// Set your Gateway IP address
IPAddress gateway(192, 168, 1, 1);

IPAddress subnet(255, 255, 0, 0);
IPAddress primaryDNS(8, 8, 8, 8);   //optional
IPAddress secondaryDNS(8, 8, 4, 4); //optional

void setup() {
  Serial.begin(115200);
  // Initialize the output variables as outputs
  pinMode(output26, OUTPUT);
  pinMode(output27, OUTPUT);
  // Set outputs to LOW
  digitalWrite(output26, LOW);
  digitalWrite(output27, LOW);

  // Configures static IP address
  if (!WiFi.config(local_IP, gateway, subnet, primaryDNS, secondaryDNS)) {
    Serial.println("STA Failed to configure");
  }

  // Connect to Wi-Fi network with SSID and password
  Serial.print("Connecting to ");
  Serial.println(ssid);
  WiFi.begin(ssid, password);
  while (WiFi.status() != WL_CONNECTED) {
    delay(500);
    Serial.print(".");
  }
  // Print local IP address and start web server
  Serial.println("");
  Serial.println("WiFi connected.");
  Serial.println("IP address: ");
  Serial.println(WiFi.localIP());
  server.begin();
}

void loop(){
  WiFiClient client = server.available();   // Listen for incoming clients

  if (client) {                             // If a new client connects,
    Serial.println("New Client.");          // print a message out in the serial port
    String currentLine = "";                // make a String to hold incoming data from the client
    while (client.connected()) {            // loop while the client's connected
      if (client.available()) {             // if there's bytes to read from the client,
        char c = client.read();             // read a byte, then
        Serial.write(c);                    // print it out the serial monitor
        header += c;
        if (c == '\n') {                    // if the byte is a newline character
          // if the current line is blank, you got two newline characters in a row.
          // that's the end of the client HTTP request, so send a response:
          if (currentLine.length() == 0) {
            // HTTP headers always start with a response code (e.g. HTTP/1.1 200 OK)
            // and a content-type so the client knows what's coming, then a blank line:
            client.println("HTTP/1.1 200 OK");
            client.println("Content-type:text/html");
            client.println("Connection: close");
            client.println();

            // turns the GPIOs on and off
            if (header.indexOf("GET /26/on") >= 0) {
              Serial.println("GPIO 26 on");
              output26State = "on";
              digitalWrite(output26, HIGH);
            } else if (header.indexOf("GET /26/off") >= 0) {
              Serial.println("GPIO 26 off");
              output26State = "off";
              digitalWrite(output26, LOW);
            } else if (header.indexOf("GET /27/on") >= 0) {
              Serial.println("GPIO 27 on");
              output27State = "on";
              digitalWrite(output27, HIGH);
            } else if (header.indexOf("GET /27/off") >= 0) {
              Serial.println("GPIO 27 off");
              output27State = "off";
              digitalWrite(output27, LOW);
            }

            // Display the HTML web page
            client.println("<!DOCTYPE html><html>");
            client.println("<head><meta name=\"viewport\" content=\"width=device-width, initial-scale=1\">");
            client.println("<link rel=\"icon\" href=\"data:,\">");
            // CSS to style the on/off buttons
            // Feel free to change the background-color and font-size attributes to fit your preferences
            client.println("<style>html { font-family: Helvetica; display: inline-block; margin: 0px auto; text-align: center;}");
            client.println(".button { background-color: #4CAF50; border: none; color: white; padding: 16px 40px;");
            client.println("text-decoration: none; font-size: 30px; margin: 2px; cursor: pointer;}");
            client.println(".button2 {background-color: #555555;}</style></head>");

            // Web Page Heading
            client.println("<body><h1>ESP32 Web Server</h1>");

            // Display current state, and ON/OFF buttons for GPIO 26
            client.println("<p>GPIO 26 - State " + output26State + "</p>");
            // If the output26State is off, it displays the ON button
            if (output26State=="off") {
              client.println("<p><a href=\"/26/on\"><button class=\"button\">ON</button></a></p>");
            } else {
              client.println("<p><a href=\"/26/off\"><button class=\"button button2\">OFF</button></a></p>");
            }

            // Display current state, and ON/OFF buttons for GPIO 27
            client.println("<p>GPIO 27 - State " + output27State + "</p>");
            // If the output27State is off, it displays the ON button
            if (output27State=="off") {
              client.println("<p><a href=\"/27/on\"><button class=\"button\">ON</button></a></p>");
            } else {
              client.println("<p><a href=\"/27/off\"><button class=\"button button2\">OFF</button></a></p>");
            }
            client.println("</body></html>");

            // The HTTP response ends with another blank line
            client.println();
            // Break out of the while loop
            break;
          } else { // if you got a newline, then clear currentLine
            currentLine = "";
          }
        } else if (c != '\r') {  // if you got anything else but a carriage return character,
          currentLine += c;      // add it to the end of the currentLine
        }
      }
    }
    // Clear the header variable
    header = "";
    // Close the connection
    client.stop();
    Serial.println("Client disconnected.");
    Serial.println("");
  }
}
در ابتدای برنامه ssid و password را به نام و رمز وایفای خود تغییر دهید :
// Replace with your network credentials
const char* ssid = "REPLACE_WITH_YOUR_SSID";
const char* password = "REPLACE_WITH_YOUR_PASSWORD";
شرح کد های فوق :
پس از فراخوانی کتابخانه های مربوطه ، در تابع Setup از طریق متد های زیر مقدار IP Local برابر 192.168.1.184 قرار داده شده است که این با این کار IP به صورت استاتیک در هر زمان برابر مقدار وارد شده خواهد بود . شرح مقادیر subnet mask و همچنین DNS را می توانید در آموزش های شبکه و اینترنت پیدا کنید . تنها نکته مهم در IP استاتیک ، متد Local_IP می باشد که با مقدار دهی آن IP ماژول به صورت استاتیک خواهد شد :
// Set your Static IP address
IPAddress local_IP(192, 168, 1, 184);
// Set your Gateway IP address
IPAddress gateway(192, 168, 1, 1);

IPAddress subnet(255, 255, 0, 0);
IPAddress primaryDNS(8, 8, 8, 8); // optional
IPAddress secondaryDNS(8, 8, 4, 4); // optional
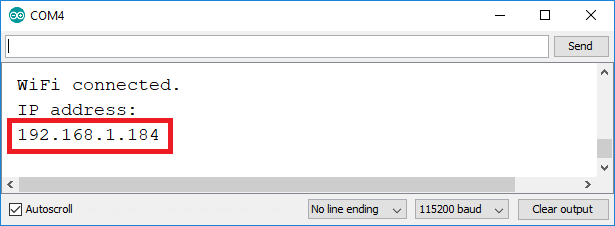
پس از تغییرات لازم در کد های فوق ، پس از پروگرام کردن ESP32 وارد محیط Serial monitor شده و یک بار برد خود را ریست کنید . در این هنگام باید مقدار IP برابر 192.168.1.184 نشان داده شود :
در صورتی که می خواهید با تغییر د رتنظیمات مودم خود یک IP استاتیک به برد ESP32 اختصاص دهید می توانید از برنامه زیر برای به دست آوردن مک آدرس برد استفاده کنید :
/*********
  Rui Santos
  Complete project details at https://randomnerdtutorials.com
*********/

// Load Wi-Fi library
#include <WiFi.h>

// Replace with your network credentials
const char* ssid     = "REPLACE_WITH_YOUR_SSID";
const char* password = "REPLACE_WITH_YOUR_PASSWORD";

// Set web server port number to 80
WiFiServer server(80);

void setup() {
  Serial.begin(115200);

  // Connect to Wi-Fi network with SSID and password
  Serial.print("Connecting to ");
  Serial.println(ssid);
  WiFi.begin(ssid, password);
  while (WiFi.status() != WL_CONNECTED) {
    delay(500);
    Serial.print(".");
  }

  // Print local IP address and start web server
  Serial.println("");
  Serial.println("WiFi connected.");
  Serial.println("IP address: ");
  Serial.println(WiFi.localIP());
  server.begin();

  // Print ESP MAC Address
  Serial.println("MAC address: ");
  Serial.println(WiFi.macAddress());
}

void loop() {
  // put your main code here, to run repeatedly:
}
خروجی برنامه فوق به صورت زیر است :
